The Future is Insight

The title of this blog works on many levels- it plays off of my belief in hybrids being a critical step towards our future, the fact that introspection and mindful planning are critical to our future, and that the future is literally in sight for those that are willing to see it. Here I chronicle my attempt to Be the Change I wish to see in the world-and to help make that Future a Reality.

Sunday, December 09, 2007

Hoop House 12/8 Update

Fall is going out with a vengeance this year. With 8" of snow on the ground from 3 2"+ snow events since Thanksgiving on top of some bittery cold nights (Wed AM was -4 F), this is proving to be a fantastic year for learning's for the aspiring Four Season Gardener. At least that is how I am choosing to categorize my demolished radishes.

2 weeks ago I had added about 150 gallons of water buckets to the hoop house. I had two solid reasons for this. First the water line running from the owner's farm house would not be open forever and I wanted some water on hand, and second I was hoping to add a degree of thermal mass to the interior of the Hoop House to help mitigate the temperature swings. Saturday morning was not warm-only 4 degrees, but it was partly sunny for the first two hours after sunrise, before descending into the more typical overcast. I had not been to the house for 10 days and the fact that the door was frozen shut did not help my trepidation of what I would find.

Good news-the spinach, mache, and claytonia are all virtually unscathed. The Black Radish , which I was gambling to get to harvest size before the bitter cold, are a complete loss
, and the bok choy is wounded, but may recover. Despite exterior temps at 3 degrees, interior was a balmy 28. To better illustrate the weather that had done in the radishes, the 5 gallon buckets of water were frozen solid. Now my thermal mass was working in reverse... But even here I incurred a learning. In addition to the dozen buckets, I also had a large black plastic garbage can I had also filled with water. It too was frozen, but only an inch or so thick. I just need more mass in my thermal mass, and the black helped with solar gain. This bucket was also full of a bushel of Comfrey Cuttings that I was letting stew into a slow brewed compost tea (make that iced tea), once it thaws I will have a nice shot of nutrients for my seedlings. This is my first attempt at compost brewing, and I am looking forward to it!

Everything has its first set of true leaves, and the spinach and bok choy are going on #2. And a huge win is that the Deep Freeze has leveled the weeds that I had missed so it looks decent. This may be small comfort when I look up at the 1/16th inch coating of ice on the inside of the plastic, but I knew I would harvest more experience than greens this year anyhow.

Tomorrow I will bring out two of my home fab "cloches" from last years season extension attempt, and I will attempt to source 2 trailer loads of fresh manure to build a compost windrow over the deceased radish. The thought is that the hot compost will add a significant amount of nighttime Btu's to give the bok choy a chance.


I had hoped for a slower start to winter, but the wonderland that the kids get to play in makes up for it. This year is a great counterbalance to last years non-winter (06/07 didn't get cold until mid January-I took root cuttings on 12/28/06) that provides a good dose of reality to the unpredictability of nature that we are aggravating with Global Warming. My hope now has switched form fresh greens on Christmas to the First Salads of Spring as I seek to overwinter the mache and spinach!

-Rob

Labels: , , ,

Stumble Upon ToolbarStumble It!

Sunday, December 02, 2007

Gasifier Project: Pics


Here in no particular order are some of the shots from our Gasifier Project Yesterday:

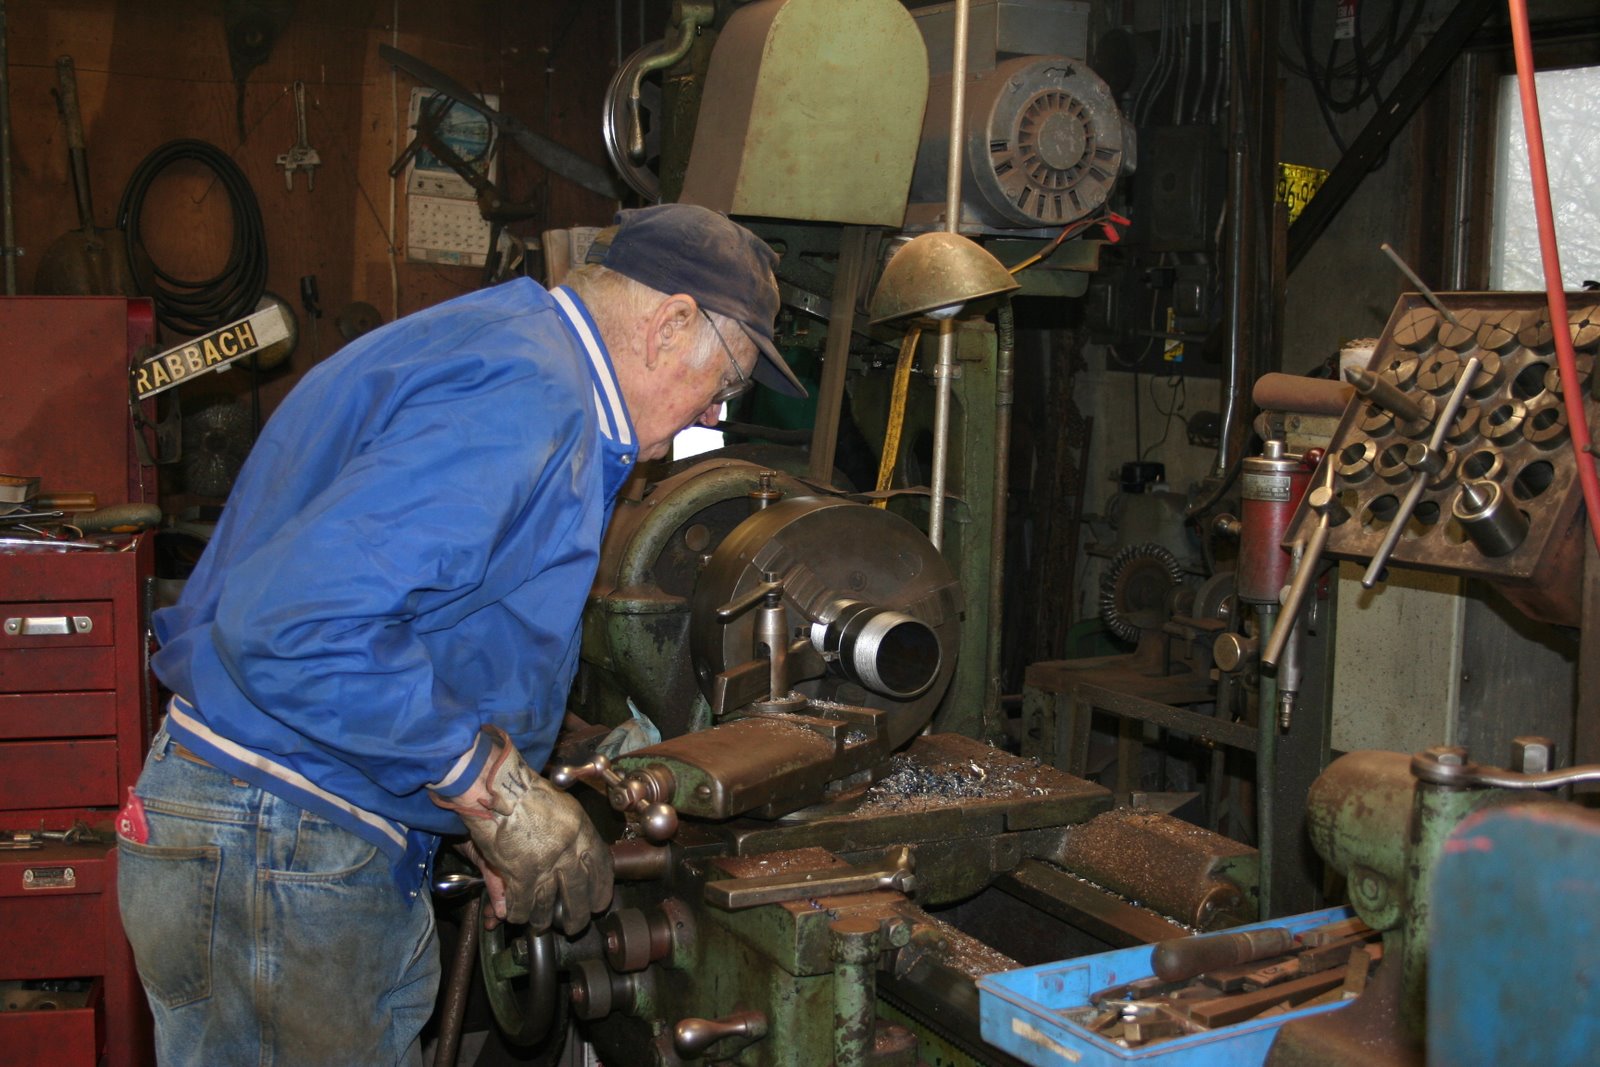
Hank is an old timer who happens to live nearby and have enough machining tools in his shop to rebuild the USS Wisconsin if we had enough steel.  Look at the size of that lathe!  Hank forgot more over breakfast than MacGuyver ever knew.  You could give him a napkin drawing of a piece and he'd rummage through a pile of scrap, put it onto the lathe and turn it out 5 minutes later.  That the world will desperately need the Hank's of the world as we hit Peak which was a main reason I was on this work party.

Here Mike and Beth take a spin on the Band Saw.  And, yes, that is 3/16" iron plate that they are cutting a 14" circle out of.
We went slooooow, so we all still have our fingers.

 It seemed like every piece from the iron pipe, to the steel drum to the carriage bolts was modified.  I am still only half certain it was all necessary, or if we were just geeking out on all the tools!

Here our resident welder and innovator, Greg, is welding the cut plate to the 8" pipe for the combustion chamber/wood chip feeder.  Like our welding stand?  Yep, its a manhole cover.

Here is yours truly running the saber saw to modify the steel drum for the combustion chamber.  Most of the time I felt in the way due to my lack of knowledge of machining, so I jumped at every chance I could to use the tools I had experience with.  I learned alot!

Greg explaining the various parts, their end functions, and the various jobs needed to get them to their finished states.  After this we all grabbed some tools and split off to make sparks and smoke.

Mike is a retired engineer.  Which makes the fact that he used a nail, jute twine, and a pencil to draw our perfect circle all the cooler.  Keep it simple!

Mike again with our finalized ash basket (a stainless steel dog food dish with a hundred holes drilled into it) sizing it up for the bottom of the now welded combustion chamber.

As the day progressed I couldn't shake the reoccurring idea that I was living in an A-Team episode where they happen to get locked into a barn unattended while given enough time to weld steel plate onto a tractor to bust their way out.  "I love it when a plan comes together!"

With only about 6 hours (30 "man" hours) of work, and less than $100 in parts we are over half way finished with the first prototype.  Next steps are attaching the wood chip hopper (metal trash can) over the top of the barrel, and attaching a heat exchanger to cool the gas before it gets to our fan which will provide the vacuum until we can hook it up to an engine. Lots of little details left, but most of the Big Fabrication is done.  And to date no one has been seriously injured!  Can't wait to see it flare later this week!

The greatest part of it all is having 6 adults, some who barely knew each other, to give up a weekend to get together to try to make a difference.  It is these meetings, whether to weld up a gasifier, plan a community garden, or discuss Plan B 2.0 at the library that are happening all across our country and are paving the Road to a more Sustainable Future.

As the nights grow longer this month reach out and begin to build a community around yourself and start something.

Be the Change!
-Rob

Labels: , ,

Stumble Upon ToolbarStumble It!

Saturday, October 27, 2007

October Planting

I had hoped to have a litany of informative pictures in place to detail my mid fall planting, but the camera went on the fritz-another issue with being 10 miles from home. Without pictures to prove it, you wil have to take my word for it: I had a very productive afternoon!

Moving the Hoop House

Last Monday I finished prepping the beds, but there was still the little item of getting the house over said beds. I brought along my 5' steel prybar and we rummaged around to find some "rollers" to help us out. The thought being we would lift up the greenhouse with the prybars, put some rollers under it and then push the Hoop House onto the prepared beds 25' to the south. We found some old fence posts and got out a chain saw to hack them up into 6 18" chunks. We also came across some planking which we put under the rollers to make it easier. The 5' prybars made short work of the lifting with proper fulcrums and once on the rollers, the whole apparatus pushed quite well-the only exception being that we drifted East repeatedly on the uneven ground. Some redirection with the prybars and we had the house moved all 25' in about 3o minutes-without using a tractor!

Seeds!

The owner had said he "might even have some seeds" when I proposed planting some winter greens. He wasn't kidding! In 2005 the property had hosted a 25 family CSA-and it turns out that the left over seeds are all still there! One of the most beautiful things about CSA's is the diversity of the produce, which is necessary to provide a half bushel of produce to each family-every week for 20 weeks. "Some seeds" turned out to be 2 5 gallon buckets of commercial size seed packets from Fed-Co Seeds. The CSA really drove the variety of cultivars-I found 5 varieties of spinach alone-many in 8-16oz packets. I think I could plant 3 acres in spinach alone! Between this stash, and E4's bounty I am set for next year with the exception of dry beans, seed potatoes and some tomato varieties that I am finicky about. For a planting this late I set a strict limit of veggies that are harvest able from direct seed within 50 days. Given the short day factor of fall planting, I figure a 30% addition on that. This limited the planting to, well, about what Eliot Coleman recommends in Four Season Harvest. In the buckets I found (in addition to the spinach) mache, black radish, claytonia, bok choy, and arugula. Even these stalwart plants should have been in the ground 2-4 weeks ago, but I am giving it a go anyhow.
Earth Way Seeder
I have dreamed of what I could accomplish in time savings by stepping up to "commercial" grade tools. The owners had 3 Earthways hanging in the shed, with another 3 tied together to plant 3 rows simultaneously. I was excited to try it, but the reality completely blew me away. What an elegant tool!! Assuming you have a prepared bed, in one pass the seeder cuts a furrow, plants a seed to the spacing you have chosen in the planting wheel (10 sizes on site), fills in the furrow with the dragged chain, and then lightly tamps the soil over the seed with the rear wheel. Dear god is this easy!! Even planting 6 different varieties, I had both beds planted in 15 minutes. The tool is so simple and easy to push that my 5 year old literally seeded two rows himself. Wow, wow, WOW! These seeders are available new for $110 and if you plant more than a few beds it is worth every penny in time and back pain saved. I planted the beds with 3x the seed needed-with the low temps and 2-3 year old seed I want to hedge my bets.
I then soaked the beds thoroughly, and drenched the wood chip paths with the intent of getting a significant amount of moisture into the house before I close it up for the week-given the temps I am not worried about mold.
This week I would like to purchase a thermometer that will allow me to tract high and low temps to see how much benefit the hoop house is netting me, and help me to determine if/when I need to add the cold frames.
Fingers crossed that I get germination in week 1!
-Beo

Labels: , , ,

Stumble Upon ToolbarStumble It!

Monday, October 22, 2007

Winter Greens?

One of the seemingly unending perks of the partnership with the local hobby farmer is that he has a small (12'x25') hoop house that is currently sitting unused. 2 weeks ago I proposed the idea of prepping some beds for some winter greens. As the owner was very enthusiastic, and even has the seeds on hand, we are giving it a go. The plot and hoop house have been unused for 2 years, so I have my work cut out for me. Still, the tools on hand are fantastic, and make the task less daunting. Plus a excuse to get dirty in the crisp October air is most welcome!

Here's the beds 2 weeks ago...

The owner has a 48" PTO driven rototiller so we cut 2 beds to the south of the Hoop House. The house is on 4x4 skids so once the beds are prepped we will put the house on some log rollers and drag the it over the prepped ground ala Eliot Coleman. This weekend I discovered a large patch of Russian Comfrey (one of my all time favorite plants) that was overgrown and got permission to cut it down for soil prep. Here is a shot of a 3x25' bed filled with .5 cu yards of comfrey cuttings (high in minerals and a great soil builder) and lined with a 1' wood chip path. The soil is so friable that you sink 2" into the tilled ground without it!

Worms...Come and get it!


On another part of the property there are 3 windrows of 3yr old leaf mold of extreme proportions: 6' tall, 12' wide and 75 yards long! This past year, another family grew squash and cherry tomatoes on them (below), next year I will most likely put potatoes on one of them.

500 yards of compost anyone?

The compost is about 200 yards from the hoop house, but 5 trips with Archimedes (my 10 cu ft barrow) and I had enough to cover the comfrey with a 2" layer to coax the worms to the feast.

Black Gold!


Rain was starting and the temps were dipping into the 40's so it was none to soon when the last load was raked flat. The beds will rest until this weekend when a few friends and I will attempt to move the hoop house over the beds. The owner assures me that 4 guys can lift it, I think we'll need the tractor. Regardless it will soon reside over the now finished beds.

Just waiting for seeds!

The beds are gorgeous, and in the 2-3 weeks it will take for us to move the Hoop House, plant and get the seeds to germinate, the comfrey should be mostly worm manure. Next year we will start a month earlier and have transplants on hand to give us a jump. Given how late we are starting, I give us a 50-50 chance of actually getting edible greens this season, but the learnings will be legion.

Now I just have to cull the hoop house of weeds:


Time to order a Scythe!

-Beo

Labels: , ,

Stumble Upon ToolbarStumble It!

Sunday, October 21, 2007

Sheet Mulch : Building Soil Nature's Way

I had the oppurtunity this weekend to take a significant amount of lawn, 1000+ sq ft, at a client's house and begin to turn it into a perrenial bed. Round-Up is not an option in my world, so I pitched Sheet Mulch and it sold. Here is a photo how to for a simple, effective 3 ingredient Sheet Mulch with materials that are locally and readily availible here on the rural fringe of Suburbia: wood chips, cardboard pallet sheets, and horse manure.

Step #1 Prep the Ground

This plot had not been mown in months, so it took several passes with my electric mulching mower to knock down the turf grasses with the great result being a 1/2" thick layer of mulched grass. The owner called them weeds, I called it a Green Manure crop!

Step #2 High Nitrogen "Starter"


In this instance there was a horse farm literally a block away from the home, but the edges of suburbia are speckled with horse farms. Some neighborly conversation can get you access to a trailer load of manure prebasted with straw/sawdust for near perfect carbon:nitrogen ratio. It sounds nasty, and it can smell alittle ripe, but use a long fork and you will be fine. I spread it about 2" thick, but feel free to go as much as 4". More than that and you might go anerobic. 2" deep for 1000 sq ft will took about 5-6 yards or 3 loads with my trailer. That's alot of forking, but you can't beat the net returns!

Step #3 Weed Barrier


I like to use pallet sheets. Most warehouses, and some retailers-especially those carry alot of pet food or other bagged product, will have these in abundance. Again, do some calling and make nice to see what you can turn up. Newspaper 4-7 sheets thick works great too, but pallet sheets are ink free, and don't blow around as much in the wind, plus each sheet covers 16 sq ft so you cover ground quick. I overlapped mine at least 6" on all sides so it took the better part of 100 pallet sheets. The manure is thick with oat and hay seeds, this layer will keep them and the turf grasses out of the bed.

Step #4 Weed Free Mulch


Every muncipality out here has a free mulch pile for its residents. This municipality even had a backhoe on hand to fill my trailer with 2-3 yards of chips in about 5 minutes! I made 5 trips in 2 hours. Check out that windrow!! And, yes, my shoulders will be unuseable tomorrow... The garden will get a 6-7" layer of this that will settle to 5-6". Spoiled hay, straw, etc would also work, but spoiled hay is alot harder to find if you aren't Ruth Stout, and straw typically costs money. Wood Chips take longer to break down, but they don't blow around much and are a perfect medium for innoculating with edible mushrooms!


Putting it Together


When sheet mulching I find it to be much easier to not let any one step get to far infront of the others. Get too much manure down and it starts to dry out, get too far ahead of the woodchipping with the pallet sheets and they start to blow away. Sheet mulching is a very satisfying to do, as the ground is covered very quickly and the sense of accomplishment is huge.

Tools of the Trade


I did this job solo in 10 hours start to finish, with the exception of having 60 of the pallet sheets on hand prior to starting. Here is a short list of some tools that saved me massive amounts of time, all of which are pictured above
  1. Utility Trailer. Mine is 5x8', cost under $700 and turns my Forester into a "pickup truck" extraodinaire, able to move 3 yards of light mulch with ease, or 2 yards of manure. Plus a trailer's sides are 3' shorter than a pickups so schlepping manure into it is much, much easier. Besides, when I don't need a work horse I take the trailer off and the Forester goes back to getting 32 mpg vs a pickups 14! I love my trailer!!

  2. Wheelbarrow. I purchased a mulch barrow for this job. $95 at TSC and it holds 10 cu feet. Even overflowing with manure I could lift it with ease-the balance is more Vermont Cart than traditional wheelbarrow with alot of the weight past the wheel's fulcrum helping you lift the wieght. I have named it Archimedes, but often call it Hubris... A barrow this big is bound to get me in trouble...
  3. Coal Shovel and Compost Fork. The Coal Shovel can move over a cu ft of mulch/manure at a scoop-mulch is light so it pays to move as much per scoop as possible. I picked it up at Menards for $16 as quality/design seemed simple. The Compost Fork is from Earth Tools and imported from Germany. It has a balance and feel that far exceeds anything you will ever find in a hardware store, and is worth every one of its $40.

  4. Helpers! Many hands make light work; I had my uber energetic 5 yr old with me. True, the amount of work done by Sprout was minimal, but the diversion of someone to talk to was priceless, and mad props to him for keeping us both entertained for a full day as "Mr. Stone" keeping the cardboard from blowing away, or squealing anew everytime I dumped him out of the wheelbarrow on the return trip to the mulch windrow. Regardless of their age, someone to keep the weed barrier from blowing away is always a good thing!

The end result of a single days hard work will be taking 1000 sq ft of very sandy loam and covering it with an 8" layer of organic matter. Through fall and into spring the soil's ecosystem will kick into high gear with the manure's nitrogen and eat away at the cardboard. The chips will also begin to decay-I see about a 25% decomposition annually in my paths at home. The net result by June should be a 2-3" layer of ecologically alive compost covered by 4" of wood chips-ready to plant!

Sheet mulching can be a great way to relatively easily turn lawn into garden-as long as you have several months before you want to plant. Those months are worth it if you can spare them: in addition to killing the sod, you keep the topsoil of your lawn, with all its ecology, intact, and add 2-4" of topsoil in the process.

-Beo

Labels: , , ,

Stumble Upon ToolbarStumble It!

Saturday, September 08, 2007

The Blessed Bulb

As we wind down the summer of 2007-with its droughts and floods- we begin to plan both our Fall gardens, and the gardens of 2008. Now is the time to plant fall crops in our locale, and our gardens are obliging by making room with the passing of the corn, melons, and cucumbers. Into those beds will go Kale, Spinach, and Carrots. The spinach for a touch of freshness as the days shorten, and the kale and carrots to keep us in vitamins deep into winter. I do so enjoy messing with the heads of our Thanksgiving guests by picking vegetables for the feast!

Back to the 2008 planning. Our #2 bed first gave us 45# of potatoes, and is about ready to finish with carrots (crop#2), cilantro (#2), beets (#2) and lettuce (#2) and the final 1/3 is currently planted with a rye/vetch mix. As the carrots and cilantro come out we now have the final phase of this bed on hand. Garlic!

Garlic is great-there is nothing easier to save "seed" from, it stores incredibly, is freaky good for you and makes most of the meals we enjoy much, much better. We love garlic. It is also very easy to grow, and you can put a sick amount of garlic into 100 sq feet as most varieties will take a 3" spacing in beds. That is about 16 cloves per sq ft. Quick math gets you up wards of 1600 cloves in one my 100 sq ft raised beds. Damn! Mia, being significantly more level headed than I in such things put the kibosh on 1600 heads of garlic, so we compromised and purchased a total of 53 heads from 5 varieties. After splitting off the cloves it should be about 4-500 heads for next year! We eat about 50-60 a year and plan to sell/give the rest to local restaurants and friends. At $1/head that is about as lucrative as you can get in a bed.In our research we had become quite smitten with a cultivar named Music: Mia loved both the story of returning to the homeland and the simple, beautiful name. I am partial to large cloved garlic, but we doubted that our small vendor would have this rare garlic. However Gaia provides! The 5-6 cloves are almost ridiculously large (below), and have a firm feel and pungent odor that hints of a pleasant flavor without being too hot.


We also scored more traditional varieties: Chesnok Red, Chrysalis Purple , and a few soft-neck varieties for Mia to braid into wreaths. These will all be stored for another 3-4 weeks and then planted with my latest tool and covered with a 3" layer of straw to sleep soundly until spring. The straw prevents Mom Nature from heaving the bulbs from the earth over winter, and then doubles as weed suppression come spring!

Garlic is not only one of the easiest and most lucrative crops for the home market grower, it also lends itself perfectly to sharing the bed with a fall lettuce crop. As the garlic is done in late July, its harvest will till the soil and Aug wk 1 is just about prime time for fall greens planting here as the nights cool again and the rains return.

Formerly I had thought of gardening in annual terms focused on the August Harvest, but as I begin to implement Coleman's Four Season Harvest, I am coming to think of it as more of a constant flow of produce broken breifly by the "catalogue season" of January/Febuary where the soil rests. This year we will have fresh picked produce from April through (hopefully!) December through simple crop selections (radishes, kale, etc) and some simple season extenders like cold frames. Not bad for Zone 4/5! On top of that each of my 7 beds saw at least 2 crops-and all of them saw 3 if you count the cover crops I overwinter on 5 of the seven (Garlic and Kale are left alone).

Happy Planting!

-Beo

Labels: ,

Stumble Upon ToolbarStumble It!

Tuesday, August 28, 2007

Commuting Carbon Nuetral: HPV Hybrids

This is something I struggle with. I live with a 38 mile round trip commute. There is no public transportation, and car pooling is difficult as each department has staggered start times. While there are beautiful country roads with passable shoulders for biking, there is that whole Winter thing, and the 38 mile daily commute is pretty daunting-even in my MTB racing days of yore.
Closer to work housing gets alot more expensive, and with the market this flat it would be difficult to offload a house on the freeway and not lose money.

These are the 2 year old arguments that led me to purchase my 2001 Honda Insight 18 months ago. In the summer I can go to work 4 days a week on 2 gallons of gas. Not too shabby! In the Winter it climbs to about 3. But we were running the math this weekend trying to find a way into acreage before I turn 40 and selling the Insight would save about $10k in the next 2 years between payments and insurance. That would knock 1-2 years off the Get Beo a Farm plan.
On a random Google trip this weekend I was looking for a Farm Bike. I have this weird fantasy of a very low geared quad Human Powered Vehicle (HPV) with a payload capacity of about 1 cu yd that I could put tools and veggies in and pedal out to the Back 40 with on my farm. I swear I have seen them, but recent searches have come up dry, though if anyone needs it, it is this guy. I did find some really sweet bikes that are pretty close from a small company in Montana called Light Foot Cycles. Their PediTruck is just about perfect, and they also sell one of the most reasonably priced Cargo Trailers for bikes I have ever seen. Spending $4k on a pedal truck for the farm is a joke, but I like looking at quirky bikes-if for no other reason than to re-assert my geekiness. Then I stumbled on the part that makes this a Carbon Neutral Post.

Light Foot Cycles sells a really slick power assist system. They sell 2-3 electric options, but they didn't seem to be strong enough for a 40 mile commute-I really got turned on by their gas option. They take a teeny tiny 1.5hp (your neighbor's lawnmower has 6.5hp) Honda 4-Stroke which is clean enough to pass CARB's small engine laws. When attached to one of their slick recumbents it will power you to 25+mph (
with fairing) as long as you have fuel-basically a long distance gasoline/human hybrid that would only add about 30 minutes each way to my commute. They don't give any economy figures, but with mopeds getting upwards of 100mpg I think this could do up to 500+ if you pedal enough on the uphills-heck the fuel tank is only about 1 cup!

But that is still not true carbon neutral. Back to that Honda 4-stroke. Any engine this small is carburated. And anything carburated can run on any alcohol mix you want with relatively little tinkering (ok-it takes alot of tinkering, but no computer hacking so I can do it with enough books, tools, and patience). E-85 is becoming more available, but I am a do it yourselfer, so I want to make my own. I posted in June about the possibility of using my favorite crop, Sunchokes, to make 1600 gallons of ethanol per acre. While I only have about 200 sq ft of Sunchokes, that would still be enough to make about 70 gallons of alcohol (someone check my math)-enough to power my HPV hybrid for about a decade (35,000 miles?!?). Plus if I tune the engine right (and get back inshape), I might hit 30mph average speeds.

A Light Foot Cycle with the ethanol modified power assist would be about $3k and a weekend or two of sweat equity- I could limp through carpooling in the winter and catch up on my reading. That extra $7k would also make the cold November commutes feel a little warmer.
Not sure how serious this is-selling an Insight because it uses too much gas seems extreme, but trading a car in on a bike feels like a step in the right direction. Regardless I think getting past the stigma that some bike commuters have against motor assisted bikes, and learning to start thinking of them as HPV Hybrid's could open up alot of options for alot of people.
Be the Change

Labels: , ,

Stumble Upon ToolbarStumble It!

Thursday, July 05, 2007

HOA Permaculture

The trees came in last week! Of course they came 22 hours before I was set to leave on a 1300 mile trip to marry off my best friend, so time was of the essence. I was able to get them in the ground with a modicum of marsh hay mulch before we left for Missouri, and was distracted most of the trip praying for rain while we were gone (unanswered, though the wedding was almost canceled due to tornadoes!). Upon our return I spent the next day sourcing materials to finish the beds on my back-hauls from delivering Rain Barrels to clients. The picture above shows the prep work as I left them last Thursday: on the right is the Speckle Pear with a Paw Paw on the other side of the bed and a pair of Hardy Kiwis on the fence. Edible Landscaping was unable to meet my order on the Paw Paw and only had 1 gallon trees on hand-hence the 18" tall "tree". What is impossible to see in this shot is the 3 French Sorrel, 2 Russian Comfrey, 2 perennial Clovers, 2 New Jersey Tea's, and 2 Hazelnut Shrubs that are also part of this polyculture. The grass surrounding this planting will be sheet mulched this month in preparation for more plantings next year.


At left is another of the tree guilds, this time anchored on an Asian Hosoui Pear Tree. This guild butts up against a 300 sq ft native planting that will provide a significant degree of diversity in both soil and insect life. This picture was taken after I had added a 3" layer of 9 month old leave compost from our village yard. The pile was steaming when I forked it into my trailer so the soil ecology will get a nice jumpstart of microorganisms! This bed includes New Jersey Tea, Comfrey, Nodding Pink Onions, and Garlic Chives in the understory, with another dozen or so prairie plants within 10 feet. In the background can be seen some of my compost bins and the tandem rain barrel set I am moving from the front yard to make room for a new, larger system I installed last week.


The bed at right has the second Paw Paw mini tree and the usual suspects in the understory. This demonstrates about how the beds look "finished" with another 4" of wood chips from the village yard on top of the 3" of compost. In the front yard I have the 2 peach trees in similar guilds, though one gets a mulch more elaborate understory complete with multiple nitrogen fixers and a bastion of beneficial attractants from still more native plantings and our large rain garden. I am lavishing plants on these guilds in my respect for the impending pest pressure that the peach trees will undoubtedly experience.


A few more thoughts on my prep. I took the unusual permaculture step of ripping the sod off. This is typically a no-no as you deplete the soil of its organic layer and much of its ecology. However, my sod is rife with quack grass and I had no interest in giving it a leg up in my forest gardens. Their rhizomes laughed at the 1' overlaps of 4' pallet sheets under our play system with shoots coming up in a nice 4' checkerboard. I have a strong dislike of that plant that borders of hatred, but I cannot deny its evolutionary chutzpa. So the rhizomes were removed leaving only the subsoil back-fill.


Without a year to add a topsoil layer through sheet mulch, I purchased 8 yards of a topsoil mix (Peat/Sand/Topsoil) that I layered on about 18" thick and then lightly tamped (ok I walked on it) and into this I planted the trees. I did break up the subsoil compaction considerably with a mattock (it scoffed at my digging fork and fancy imported spades) before planting. My intent was to mirror a forest soil strata as much as possible, so starting with my subsoil back-fill and placing topsoil on top of that, I then applied the 3" layer of mostly decomposed leaf litter from last years leaves. This simulates the micro-organism rich layer immediately beneath the surface in a true forest-the layer that feeds 90% of the plants in the forest. On top of this, the wood chip layer mimics the carbon rich mulch found in any forest-consisting of fresh leaf litter, twigs, and fallen branches. This is the layer that will provide the fuel for future generations of my soil ecosystem, while also protecting the soil from compaction and the suns rays. All trees were also inoculated with mycorrhizal fungus spores prior to planting to give the beds a more balanced soil system.


Next steps will be ensuring that the trees survive the ordeal of being shipped half way across the country and transplanted, and then to sheet mulching the rest of the lawn in this section to prepare the way for next years plantings. Only other additions planned for this year are some gooseberries and perhaps some strawberries as ground-cover and fungus inoculant to encourage decomposition of the mulch layers.
Will it work? Can I grow a suburban orchard "beyond" organic-with virtually no future inputs besides mulch? The next 3-5 years will tell!
-Beo


Labels: , , ,

Stumble Upon ToolbarStumble It!

Monday, March 26, 2007

Permaculture Guilds: A Primer

Permaculture is a world created by merging the words "permanent" and "agriculture" or more correctly "culture". Looking around, it is very hard to find a more permanent (i.e. sustainable) form of agriculture than, well, Nature; no one has to fertilize a Forest! And that realization is the crux of Permaculture in a nutshell: mimicking Nature's vast experience in sustainability to make our own crude agriculture more sustainable in turn. In other words we are using Gaia as a mentor, rather than a nemesis. I have not actually attended a Permaculture Design Course, so I am not an official teacher, but I have read most of the major texts and they have literally changed my outlook on everything from our household's waste stream to my perennial beds and choice of pets.


Guilding is perhaps the coolest detail level aspect of Permaculture theory. In Nature plants are grouped in small, reoccurring but loosely defined communities that are often referred to as guilds.

A full guild will have seven layers-each specifically designed to use one aspect of both the sun and root strata. On top will be the Large Trees, followed by the low trees, shrubs, herbs, vines, groundcovers, and finally "root" plants. But Gaia is subtle, and the coordination goes far deeper than resource use. Each participant in the guild brings a wealth of diversity to the table. The tall tree may house small animals that distribute seeds for them, and the shrub layer may provide feed for birds that use the low trees for nesting habitat and feed on insects that prey on the large trees. Plants in the herb layer may fix nitrogen for all to use, and the "root" plants may seek out pockets of nutrients in the soil that are made available to others in the guild as their foliage decomposes. Some plants will attract pollinators, others predatory insects. Some will act as mulch plants by creating excess biomass that regenerates the soil, while their neighbors may act as fortress plants protecting the entire guild from the encroachment of outside species. The inter-connectivity is how nature works-nice tidy systems that sufficiently supply the community with all of its needs given water and sunlight and a proper climate.
Permaculture takes this knowledge of resource management and biodiversity and attempts to modify nature into agriculture, which is really nothing more than an ecosystem modified by humans for their own ends. Unfortunately we have chosen to do this in a way that favors the monoculture. True Iowa GMA corn can net 240+ bushels of corn/acre, and is the most productive way known to eck corn from that acre (consequences be damned!), but Gaia can produce far more biomass on her own from that same acre without any inputs at all. The trick is to find a way to merge Gaia's productivity and self sufficiency with plants that produce usable products from humans. "Guilding" a garden is that attempt.
For suburban use, the guilded Food Forest often forgoes the Tall Tree layer. One apex tree of this size would overly dominate a typical lot, but if you are planting a large deciduous tree to shade your home consider a useful tree such as a Standard Pear (fruit), Sugar Maple (syrup), Chestnut (protein!), or Black Locust (nitrogen fixer!). The Low Tree layer is where I focus most of my guilds. All semi dwarf rootstock fruit trees fit nicely and are uber productive on a suburban scale. Things to consider are whether you need a pollinator tree and also the ability of that variety to survive organically in your local-pears, paw-paw, and cherries are all good choices for the midwest with apples and plums good fits with careful pest management.
The fun really starts in the shrub, herb and root layers because of the amazing variety available. Each guild will need to provide for the needs of the group in as many ways as possible. Each needs 5 things: Nitrogen, Nutrients, Mulch, Pollination, Protection-both from competition and pests. When choosing your plants, in addition to a usable product for your family, each should provide a surplus of at least one service to the guild. Comfrey is a personal favorite of mine. The leaves are edible and medicinal, the roots are nutrient hounds, and they produce so much biomass that they can literally be hacked down to the ground 5 times a year. Nitrogen fixers are legion-including many edible varieties of annual beans and peas. Clovers are great n-fixers that also attract benifical insects and act as a mulch. My favorite shrub is the Goumi as it fixes nitrogen, has edible fruit and gives a good thicket habitat for insectary birds. Brambles and hazelnut shrubs are also great choices. Fortress plants can be as common as daylilies (also with edible tubers and buds!) or daffodils, as tasty as garlic, or if you really need to beat something back use an aggressive alleopath like our native Jerusalem Artichoke-but be ready to keep it under control! Luckily the best way to do this is by eating the delicious tubers!
A well designed guild will need little additional water due to less evaporation from the dense plantings and thick mulch, little to no fertilizer as it produces its own, and little to no pest control as the plants will attract their own predators. Sound to good to be true? Take a stroll through an established prairie or savanna and then ask the forester about his fertilizer or water bill...
My guild plans tend to rely on the fruit tree to supply most of the food, with the herb and shrub layers mostly supporting the tree's needs while also granting some side benefits like edible fruits, landscape beauty, and wildlife habitat. Look for many updates, including plant lists, on my guilds as the season progresses!
If this post whet your appetite, the most accessible book on temperate permaculture is Toby Hemenway's Gaia's Garden and I highly recommend it!

Labels: , ,

Stumble Upon ToolbarStumble It!

Saturday, March 24, 2007

Sheet Mulch: Spring Edition

Not sure if you noticed yet, but we have a propensity to add perennial beds at a pace that is almost concerning. Last year that meant I spent alot of time, effort, and profanity cutting and hauling sod. The kicker with removing all that sod is not only the effort expended, but also the fact that it includes about 50% of my topsoil. That I paid for. True I am composting the sod, but it seemed wasteful-and in terms of time and energy it certainly was.
So if you have followed some of my earlier posts about this years plans, we intend to get into orcharding. Not huge, but 4-8 trees. Alot of this is in pursuit of my goal of growing 1 ton of food on our suburban lot in Zone 5, another goal is to finally plant some real permaculture guilds from the ground up. The picture at left is my first real foray down those paths.
The first picture is my laying out of about 15 cardboard slip sheets that I got from our local organic feed store (yes, we have an organic feed store-have I mentioned I love WI?). The slips protect bags of grain from damage and typically are recycled, but they are also the perfect size for sheet mulching. Any local business that deals in palletized freight should have plenty for you-just make sure they weren't shipping pallets of Diazinon...
I also collect about 20 gallons of organic waste from a local coffee shop each week. That raw material has been building up all winter in a compost bin-to the tune of almost 2 cu yards. I opened up that bin and trucked it to the front yard to spread it about 8" thick across the cardboard-I know it was damp because 2/3 of the pile was still frozen!
Once that was rough leveled with a rake, I top dressed it with a 3-4" layer of chips from our local village yard as seen in the final picture. By mid May when I want to get my trees and guilds in, the raw organic material will be 75% composted and teeming with microbial life with all its goodness. So instead of removing 50% of the topsoil I built it 6" deeper!
Here is the best part-doing this the traditional way would have taken at least a weekend of toil. Instead this took less than 2 hours-and that includes going to get the chips from the village lot. The benefits of letting Gaia do the work for you are legion: better soil, less effort, and more time to devote to other tasks. Plus the chance to lay out fetid masses of "garbage" in your front lawn and then take pictures of it while my neighbor's watched was priceless!

Want to sheet mulch yourself? It is crazy easy:
  • Sprinkle a high nitrogen fertilizer over the area to be converted to garden to jump start the process. Raw manure is great, I used pelletized chicken manure due to lack of livestock. Seeds in this layer are fine. Sprinkle lightly with water if needed to get it moist.
  • Lay out your weed barrier, ensuring at least 6" overlap at the seems so the sod doesn't try to creep through. I prefer cardboard as it doesn't blow away as easily and is readily availible, but 3+ layers of newspaper work well too. Even jeans or natural carpet would work! Keep this layer damp.
  • Cover this with compost materials at least 4" thick, but 8" is better. Remember that this will be you soil material and it will break down to 50% of its original volume. Anything that would go into your pile is fine, but avoid noxious invasive weed material like Quack Grass rhizomes. Ensure entire layer is moist.
  • Top dress with at least 4" of weed free mulch. Wood chips, marsh or spoiled hay, straw, etc are all fine. This is the layer that keeps the weeds seeds below from ever germinating and can be as aesthetic as you need.

That's it! You can sheet mulch around existing plants by cutting holes in the weed barrier, or pull the mulch back when you want to add plants. remember to give air space between the mulch and the stems to avoid vole and fungal damage.

Congrats! You have just created a haven for microbial life, built literally tons of life sustaining humus and you proved to the world that you don't need a rototiller to make a garden!

Be the Change!

Labels: , , ,

Stumble Upon ToolbarStumble It!